Feeds:
Posts
Comments

Archive for April, 2016

Happy Passover!

My first seder this year had all the familiar comforts of traditional Ashkenazi fare surrounded by family. We ordered dinner from the same caterer we’ve been relying on for over 30 years since the first Passover my Bubbie hosted after her husband, my Poppie, passed away. The menu’s remained virtually identical over all those years (though this time we went crazy and got mashed potatoes instead of roasted), and we like it that way.

For the second seder, I returned to New York and went to the James Beard House where Chef Raffi Cohen of Raphael in Tel Aviv prepared a Sephardic feast. While I don’t typically eat kitniyot – legumes, grains, and seeds – on the holiday, I was happy to partake and experience another way of celebrating. The room was filled with flowers – not in vases, but adorning hair and lapels with headbands and boutonnieres that the organizers had woven together in the weeks leading up to dinner.

OLYMPUS DIGITAL CAMERA

The flowers and the menu – fresh fava beans, artichokes, young lamb, corn “couscous” – reminded me that Passover is also known as “chag ha’aviv,” the holiday of spring.

I’ll be spending the last days of Passover with my Atlanta family and baked a few sweet snacks to bring along. While I never got around to trying Claudia Roden’s almond orange cake like I said I would, I have developed a mandel bread recipe.

OLYMPUS DIGITAL CAMERA

One of the fun things about Passover cooking is the challenge that ingredient limitations bring. Granted, I’m lucky enough not to have to pull off entire meals, so I can find joy in making just a few special dishes. I love biscotti and thought that mandel bread would be a worthy trial of my own self-inflicted Passover baking restrictions: no matzah meal, no cake meal, no potato starch.

OLYMPUS DIGITAL CAMERA

Mandelbrodt in Yiddish means almond bread, and I was determined to come up with a recipe that only uses 100% almond flour. Extensive searching yielded few results (thanks Molly and Jessica for helping me on my quest) and both of those recipes used little to no egg. Eggs are important for biscotti and their double-baked brethren. Which brings us to a little science and how I worked out this recipe. I’ve done enough experimenting with biscotti to have figured out a few tricks to yield cookies that are crispy and crunchy but not tooth-shatteringly hard. (Remind me to tell you about the job I clinched with a  presentation about biscotti).

OLYMPUS DIGITAL CAMERA

Mandel bread typically contains oil which results in a moister, crumblier cookie compared to biscotti, but since I was using almond flour which has a lot of its own oil, I figured I could hold off on the oil and see how things turned out. (Plus, I didn’t feel like going out to buy Passover vegetable oil.)

To prevent the cookies from becoming leaden, I whipped the eggs with sugar for a good five minutes. This aerates the dough and helps the mandel bread stay light and airy. I learned this trick from Joanne Chang of Flour Bakery.

Most mandel bread recipes call for baking powder, but I substituted baking soda (doesn’t require special Passover certification, plus, I didn’t feel like going to to buy Passover baking powder – are you sensing a theme here?) and then added a little bit of lemon juice as an acid to activate the chemical leavener.

Bored yet?

No worries. I’ll just leave you with the recipe.

OLYMPUS DIGITAL CAMERA

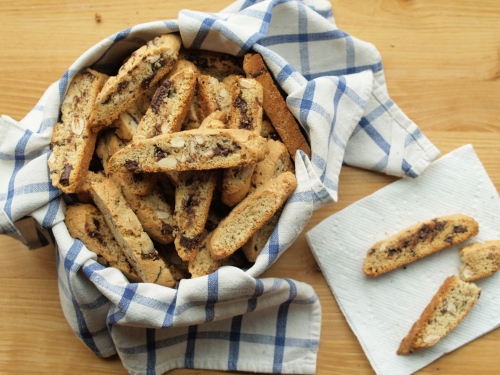
Chocolate chunk mandelbrodt/mandel bread

Makes 4 dozen

– 3 eggs
– 1 C sugar
– 1/2 t almond extract (optional)
– 1/2 t baking soda
– 1 t lemon juice
– 4 C almond flour
– 1 C raw almonds, chopped
– 5 oz dark chocolate, chopped or 1 C semi-sweet chocolate chips

Prep. Heat the oven to 350ºF. Line a large baking sheet with parchment paper.

Whip. Using a stand mixer fitted with the whisk attachment (or a hand-held mixer), beat together the eggs, sugar, and extract on medium-high for 5-6 minutes, or until the mixture is light and thick and lemon colored.

Mix. Switch to the paddle attachment on your mixer or grab a large spoon or spatula. Mix in the baking soda and lemon juice. Gently fold in the almond flour just until it’s incorporated – the mixture will be thick and sticky. Mix in the nuts and chocolate.

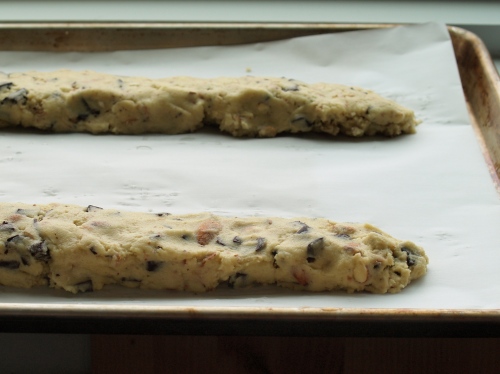
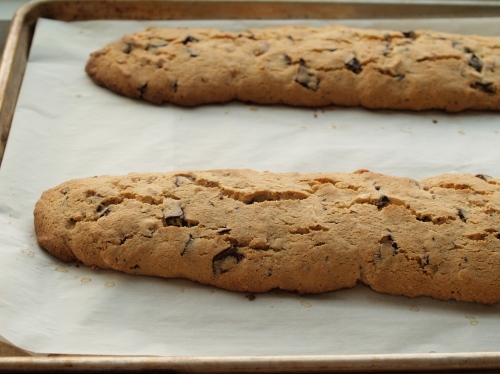
Bake. Form the dough into two long, skinny logs on the baking sheet, about 16 inches long and 2 inches wide, making sure to leave space between them because they will spread a bit. There will be a lot of patting and nudging, but eventually you’ll wrangle it into the right shape. Wet your hands to keep the dough from sticking to them too much. Bake for 30-35 minutes, until the logs are golden brown, cracked, and firm to the touch in the middle.

Lower heat. Reduce oven to 300ºF.

Cool. Allow the loaves to cool on the baking sheet for about 20 minutes until they’re cool enough to handle.

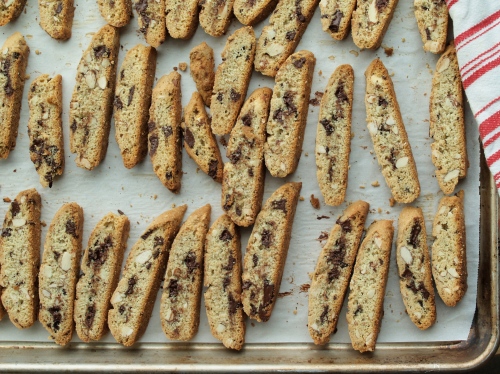
Slice. Transfer the loaves to a cutting board and, with a sharp serrated knife, slice on a diagonal into 1/2-inch cookies, approximately 2 dozen per loaf.

Bake again. Return the slices, cut side down, to the baking sheet and bake for 15 minutes. Remove the sheet, flip the slices, and return to the oven for another 15 minutes.

Cool. Let cool completely.

Store. The cookies can be stored in an airtight container at room temperature for up to 2 weeks.

Read Full Post »

the bialys

At the end of last year, I baked from and wrote about The Hot Bread Kitchen Cookbook and never posted the link or photo here. So, this afternoon, just a mere few days before Passover, I’m remedying that with author Jessamyn Waldman Rodriguez’s bialys. Sorry folks, I know it’s cruel, but if you keep scrolling down, I’ll link to a few of the Passover sweets that I’ll be bringing to the seders.

OLYMPUS DIGITAL CAMERA

But first, let’s talk about this cookbook and the bialys. The Hot Bread Kitchen Cookbook combines so much of what I love about the food industry in one place and is a reflection of the great work that Hot Bread Kitchen does. HBK is a commercial bakery that turns out a variety of breads reflecting the ethnic diversity of the largely immigrant staff who participate in and graduate from the Bakers in Training program, the social enterprise side of the business. HBK also houses an incubator that helps build out new food companies. HBK is all about great food driven by a mission and supportive of entrepreneurship.

As further proof of its special-ness, the cookbook won Food52‘s The Piglet tournament of cookbooks this year, edging out some of my other faves including those that have showed up on these very pages: Modern Jewish Cooking (Leah Koenig‘s hamantashen dough is the best I’ve ever worked with) and Zahav: A world of Israeli cooking (salads! laffa!).

As for the bialys, before I even attempted to bake a batch, I read Mimi Sheraton‘s The Bialy Eaters, the story of the author’s journey across the world to find a truly authentic version of these onion- and poppy seed-flecked rolls. Rodriguez and her team used Sheraton’s parameters to develop their signature bialy and, shortly after launching this product, the bialy aficionado called with praise.

Like many recipes in the book, the one for bialys had several sub-recipes, which can be (and was to me) daunting. Nonetheless, I overcame my intimidation, set aside a day when I could work on other things at home while the dough was undergoing multiple risings, and followed the detailed instructions. The result: a dozen airy bialys with a crisp crust and a deep well of golden onions and poppy seeds. I burnt my fingertips on the first couple, brought a few to a friend’s shabbat dinner (I was unabashedly stingy and greedy when it came to my bialys), and stashed away the rest in the freezer. My frozen supply has dwindled, and Friday morning I plan to pop the last one into a warm oven, slather it with salted butter, and enjoy my last bite of leavened bread for a week.

In the interim, I’ll be baking up a slew of Passover desserts: these macaroons with lime zest instead of orange, chocolate hazelnut cake-lets, and some version of Claudia Roden’s almond orange cake (more on that later once I get the recipe right). And don’t forget matzah brei.

And for a little bit of Passover reading, check out Dan Barber‘s piece in last weekend’s NY Times: “Why Is This Matzo Different From All Other Matzos?“.

Bialys

Adapted from The Hot Bread Kitchen Cookbook by Jessamyn Waldman Rodriguez.

This recipe requires some advance planning since the first step is to make a pâte fermentée – a pre-ferment dough and allow it a slow rise in the fridge overnight. The bialys really are best straight from the oven, but after a day or two, I just pop them in the oven for a few minutes to crisp up the outsides. They freeze nicely too. 

When I spoke with HBK’s Jessamyn Waldman Rodriguez, she recommended dipping the flattened dough disks (step six) into a bowl of cornmeal before placing them on the baking sheets. This will result in extra crunch along the bottom and sides of the bialys, achieving an ideal texture.

Makes 12 (5-inch) bialys

Bialy dough 
1⅓ cups/320 g lukewarm water
3½ cups plus 2 tablespoons/465 g bread flour, plus more for shaping
½ cup plus 2 tablespoons/150 g (risen and deflated)
Pâte fermentée (see below), cut into walnut-size pieces
¾ teaspoon active dry yeast
1 tablespoon kosher salt

Filling
3 tablespoons extra-virgin olive oil
4 medium yellow onions, finely diced (6 cups/900 g)
½ cup/60 g fine dried bread crumbs
1½ tablespoons poppy seeds
½ teaspoon kosher salt

1) To make the bialy dough: Put the water and flour in the bowl of a stand mixer fitted with a dough hook, and mix for 2 minutes. Let rest for 20 minutes.

2) Add the pâte fermentée, yeast, and salt and mix on low speed until the dry ingredients are completely combined. Add a little more water if this hasn’t happened in 3 minutes. Increase the speed to medium to medium-high and mix until the dough is smooth, pulls away from the sides of the bowl (and leaves the sides clean), has a bit of shine, and makes a slapping noise against the sides of the bowl, 5 to 7 minutes. Do the windowpane test* to check to see if the gluten is fully developed.

3) Dust a clean bowl lightly with flour and transfer the dough to it. Cover the bowl with plastic wrap (or put the whole bowl in a large plastic bag) and let stand at room temperature until doubled in volume, about 1 hour and 30 minutes.

4) Meanwhile, to prepare the filling: Heat the oil in a large skillet set over medium-low heat. Add the onions and cook, stirring now and then, until they just begin to brown and have reduced to about a third of their original volume, about 20 minutes. Transfer the onions to a bowl and stir in the bread crumbs, poppy seeds and salt. Set aside to cool.

5) Transfer the dough to a lightly floured surface. Divide the dough into 12 equal pieces (each weighing about 2¾ ounces/80 g). Form each piece into a small bun, cover with plastic wrap, and let rest for 5 minutes. Proceeding in the same order in which you shaped the pieces into balls, flatten each ball with the heel of your hand into a disk about 4 inches/10 cm in diameter.

6) Line the backs of 2 rimmed baking sheets with parchment. Put the disks on the baking sheets, evenly spaced and at least an inch apart. Loosely cover with plastic wrap. Let stand until the rolls are very soft and hold an indentation when you touch them lightly, 1 hour to 1 hour and 30 minutes.

7) Put a pizza stone on the middle rack of the oven and preheat to 500°F. Let the stone heat up for at least 30 minutes.

8) Uncover the bialys and, using the pads of both your index and middle fingertips, make a depression in the center of each disk of dough. Put about 2 tablespoons filling in the center of each bialy, spreading it out so it fills the center.

9) In one swift motion, slide the bialys and the parchment onto the pizza stone. Bake until golden brown, 12 to 15 minutes. Transfer to a wire rack to cool for a few minutes (discard the parchment).

10) Serve immediately. Leftovers can be kept in an airtight plastic bag at room temperature for 2 days.

* Windowpane test: Whether you mix your dough in a mixer or by hand, the final check to make sure the gluten in your dough is properly developed is called the windowpane test. Tear off a small piece of dough about the size of a golf ball. If it is sticky, dredge it through a little extra flour to make it easy to handle. Use your hands to gently stretch the dough from all sides until it forms a thin, nearly transparent layer that you can see the light through if you old it up to an actual window or light. If you can stretch the dough to that state, it means the gluten is developed and your bread is ready to rise. Simply press the small dough ball back into the large one and proceed. If, on the other hand, your dough tears before you can stretch it thin enough to see the light through it, keep kneading it until it passes the test.

Pâte Fermentée

Makes about 1¼ cups (risen and deflated)

Pâte fermentée is an ingredient in many recipes in the lean and enriched doughs chapters. You need to make it eight to twenty-four hours before you bake your bread. This extra step extends fermentation time and allows you to achieve a light, flavorful loaf with less yeast. Pâte fermentée contains the ingredients of simple French bread dough—flour, water, yeast, and salt—so, in a pinch, you could bake and eat it. Unlike other types of pre-ferments, such as levain, pâte fermentée does not impart a sour flavor to the bread. Instead it adds depth of flavor and extends the shelf life of your bread. If you make bread often, you can save the trimmings from lean doughs to use in your pâte fermentée. More likely, if you are making a rustic batard, traditional challah or any number of the breads in “The Hotbread Kitchen Cookbook,” you will mix a batch of the pâte fermentée the day before, then refrigerate it until you are ready to bake.

½ cup plus 1 teaspoon/120 g
Lukewarm water
⅔ teaspoon active dry yeast
1⅓ cups plus 1 tablespoon/180 g bread flour
1 teaspoon kosher salt

1) Put the water and yeast in the bowl of a stand mixer fitted with a dough hook, then add the flour and salt. Mix on low speed for 2 minutes until combined into a shaggy dough. Cover the bowl with plastic wrap and let stand at room temperature for 30 minutes.

2) Refrigerate the mixture for a minimum of 8 hours and a maximum of 24. (There is no need to return it to room temperature before using.)

3) If you’re measuring the pâte fermentée rather than weighing it, be sure to deflate it with a wooden spoon or with floured fingertips before measuring.


Read Full Post »