Feeds:
Posts
Comments

Archive for October, 2011

I failed my first test today.

Not the first one in my life, of course. Just the first one of my cooking techniques course.

Today was knife skills. After waking up at 8 am (on a Sunday!) and fortifying myself for the drive through the first inches of snow on the ground (in October!) with a strong cup of coffee and over easy egg on toast, I sat myself down on a little chair with a little arm desk attached. I felt like I was back in high school.

Sitting in these little chairs, we learned the anatomy of a knife from tang to tip. How to hold a chef’s knife. How to sharpen a knife. How to test the sharpness of a knife by slicing right through a piece of paper.

We learned knife etiquette. Keep knives sharp. Always cut away from yourself. Never hand a knife to another chef; place it on the table and let him pick it up himself. Walk with your knife pointed downward. “A falling knife has no handle; do not attempt to catch it.” Clean and dry your knives as quickly as possible. Never put your knives in a dishwasher. Keep knives sharp.

We chose our knives and made our way over to a large stainless steel table set with a pile of vegetables at each of a dozen stations. We wrapped an apron around our waists and tucked a towel in the ties. I positioned myself in front of the stove and salamander to keep warm. We set our cutting boards down on a cloth so they wouldn’t move, placed a dough scraper under the right side of the board.

We practiced holding our knives: choke up on the bolster, just in front of the handle. We practiced our “claw” hand – curling our left fingers under and our thumbs in to hold our vegetables without slicing off a finger.

And then we set to work. We cried our way through a fine chop of an onion. We minced garlic and turned it into a paste with the tip of our knives.

We made batonnets from potatoes – just a fancy name for cutting them into french fry shapes. Then we diced cubes of all sizes. We medium diced zucchini (1/2 inch all around). We seeded peppers and tomatoes and cut them into a small dice (1/4 inch). We julienned carrots and bruniosed – cut them into teeny tiny cubes (officially 1/8 inch). I quickly learned that uniformity will be my struggle.

Next we sliced. Carrots into rondelles (coins), half moons and quarter moons. Celery into diagonal/bias cuts. Fennel shaved as thin as possible (mandoline optional).

Herbs followed. A few quick chifonnades of parsley and we had a nice fine chop without bruithsing the leaves and losing the flavors onto the board. Tiny slices of chives – as thin as possible. Rosemary chopped super fine. Get the picture with herbs? Teeny teeny tiny.

We also suprêmed oranges. I ate mine.

Finally we got cooking. Vegetables into some olive oil with canned tomatoes. Pasta into a huge pot of boiling salted water, and then into the vegetables. Parsley, chives, and garlic paste into melted butter, then butter brushed onto a split baguette and tucked into the oven. Potatoes soaking in water dried off and dropped into hot oil. And then tossed with parmesan and rosemary.

And then we dined.

When I got home, I tested my knives. I held up in front of me a piece of paper between two fingers. I held my favorite knife above the edge of the  paper and slowly lowered it, waiting for the swift swoosh of a nice long cut. Instead, barely a crinkle. The paper buckled under the weight of the knife, crunched a bit, and remained intact. I honed the knife and tried again. Crunch. Second knife. Crunch. Third. Crunch. Fourth. Crunch.

Oy.

But after failure, success.

Using some of my new techniques and holding my (dull) knife correctly for once, I rough chopped many of the same ingredients from the morning into a stew for the week.

Moroccan beef and chickpea tagine.

I’m working on one pot meals. This is my first. And it’s good enough for company. Especially in front of a fireplace.

A tagine is a north African stew made in a dish called a tagine with a tight-fitting, pointy domed top. It is traditionally served over couscous. The inspiration for this recipe comes from my friend Sarah at FoodBridge (she actually made couscous from scratch!) and Deb at Smitten Kitchen and I used what I could find in my fridge. Butternut squash would be a great addition. When I made this, I made two versions – one with meat and one veggie. For the veggie version, I added extra chickpeas and made the stew in pretty much the exact same way. My friend Ilana told me that her Moroccan friends use really large chunks – whole carrots, potatoes and zucchini cut in half – and each person cuts off a few pieces of what they want. I’m going to try that next time.

If  you don’t want to use canned chick peas, you’ll need prepare dried chickpeas a day in advance. Sort through the dried chickpeas to remove any black ones or little stones. Soak them in at least three times the amount of water overnight (~10-12 hours) with a large pinch of baking soda. Rinse them off the next day and pour into at least double the amount of boiling water. Reduce to a simmer and cover for about 1.5  hours until tender but not falling apart. Drain and add to stew.

– 2-3 pounds of stew meat

– olive oil

– spices to taste (I like a lot of spice, and have provided approximate measurements):

– cumin (1-2 T)

– cinnamon (1/2 – 1 T)

– nutmeg (pinch)

– dried coriander (1/2 – 1T)

– turmeric (1/4 t)

– ginger powder (1/2 t)

– several saffron strands seeped 5 minutes in hot water)

– 8-10 C water

– 1 large onion

– 3-4 large carrots (or 2 large handfuls of baby carrots)

– 3-4  celery stalks

– 3-4 thin-skinned potatoes

– 2 large zucchini

– 3-4 C chickpeas

– salt and pepper

Braise. Heat enough olive oil to cover the bottom of a large heavy pan (I used a large 6 3/4 quart cocotte) until it glistens. Cut meat into smaller pieces (3/4 to 1-inch cubes) and brown with half the spices. Add the water and bring to a boil. Scrape up the good bits stuck to the bottom of the pan. Turn down the heat and simmer, covered, for 30-40 minutes until the meat starts to get tender.

Prep the vegetables. Rough chop onions into large pieces. Cut baby carrots in half or peel and cut carrots into 1-inch pieces. Cut celery into 1-inch pieces. Scrub the potatoes and dice into 1-inch cubes. Cut zucchini into large half moons.

Simmer. When meat is tender, add harder vegetables – onions, carrots, potatoes – and the rest of the spices, salt, and pepper. Simmer, covered, for another 30-40 minutes until vegetables are tender. Add zucchini and simmer for another 20 minutes. Add chickpeas in the last 10 minutes.

Serve. Pour meat, vegetables, and broth over couscous (or Israeli couscous, sometimes called p’titim in Hebrew or acini de pepe in Italian)

Read Full Post »

I woke up the other day and made lunch. I ate it for breakfast.

Because I knew I wouldn’t be able to grab lunch later in the day.

See, I was flying down to Philadelphia for a conference.

With the CEO of my company.

On our teeny tiny corporate plane.

So petite, that you can’t stand up in the cabin. You have to crouch.

Especially when you’re wearing 4-inch heels.

Flying south, we saw the entire island of Manhattan and I could almost make out my old apartment building on the edge of Central Park at the 86th Street transverse.

Flying north, I dreamt of dinner.

Mac and cheese, to be exact.

From a box.

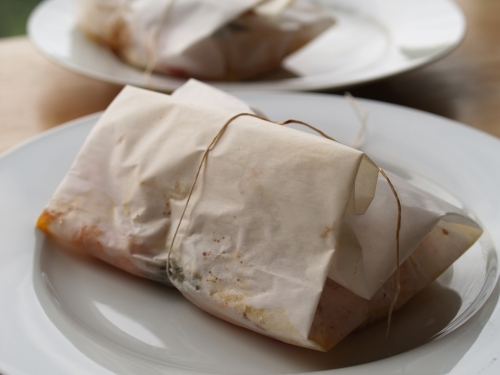
Salmon en papillote with tomatoes and basil

Adapted from Dorie Greenspan‘s recipe for salmon and tomatoes en papillote.

I like to make my salmon in individual packages, but if you’re serving a crowd, you can make an entire filet wrapped in a very big sheet of parchment (or aluminum foil). There are lots of great flavor combinations – try cilantro/lime/tequila or thyme/skinny asparagus/white wine or ginger/sesame oil/soy sauce/spring onions. You get the picture.

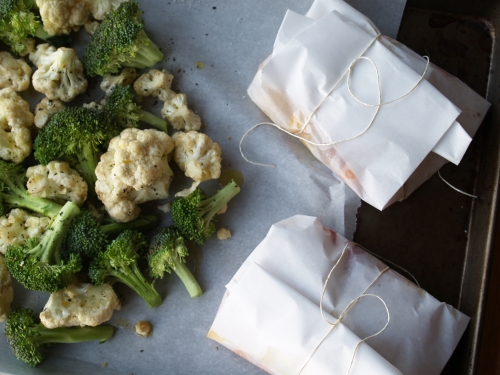
Preheat oven to 475ºF. Throw a handful of small tomatoes (cherry, pear, etc.) into a pan with olive oil, salt, and pepper, and sauté until they start to blister and brown. Pat salmon filets dry with a paper towel and place them on a rectangle of parchment (about 4 times as large as the filet). Crush a few leaves of basil in your hand and lay them on top of the fish. Top with a slice or two of lemon and a few squeezes of lemon juice. Add a nice drizzle or two of olive oil and dust with salt and pepper. Surround the fish with the tomatoes.

Fold the parchment around the fish into an airtight envelope (or something resembling an airtight envelope). Tie with kitchen twine. Bake for 10 – 12 minutes, depending on how well done you like your salmon.

Cut open the packet and eat.

Read Full Post »

the chase

This recipe.

This recipe.

I’ve been chasing it for a long time.

It started with a birthday (Alyson‘s) and a pan that I had bought over Thanksgiving last year. Last year, folks.

It continued with a pâte sucrée that took months to perfect.

There were few false starts. The caramel burned. The pâte fell apart. The caramel burned again. And then.

And then one tarte had the potential for greatness. The wine and sugar caramelized. The pears softened. The pâte rolled out and tucked in beautifully.

But then.   

But then it fell short.

Note to self, peel and cut more pears to fill the center.

And finally, finally last week, perfection. Or pretty damn close.

Or course, when the tarte cooperates, the sun does not.

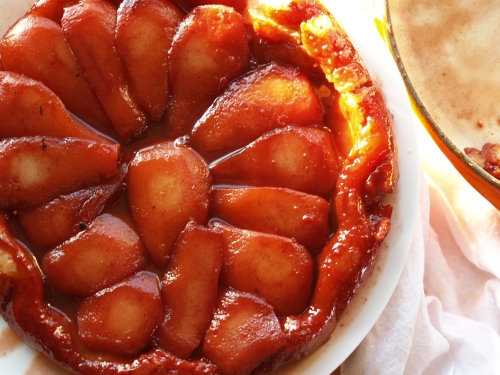
I actually placed the tarte on a rolling cart and chased the sun around my apartment. I finally got one good shot of the whole tarte in all its glory. Scroll back up to the top if you want to relive this shining moment.

Ilana came over to “taste” this year’s version of the tarte.

There wasn’t very much left over.

Tarte Tatin aux Poires et Vin

Serves 6-8. (Or 1 hungry Ilana.)

This tarte was inspired by a recipe in Food & Wine but unfortunately I found the proportions, use of puff pastry, and cooking time to be off target, resulting in a burnt mess on my first attempt. Instead, I adapted the tarte tatin recipe included with my tarte pan to incorporate red wine into the caramel and replace traditional apples with pears. This is a recipe that is not for the faint of heart. There’s a crust to make from scratch. Caramel to try not to burn. A breath-stopping flip of a juicy tarte. This is a special occasion dessert.

– 2 C red wine (I’ve made it with house red, Bordeaux, and Cabernet)

– 2 cinnamon sticks

– 1/4 C butter (or margarine)

– 1/2 C sugar

– 3-4 Bartlett or d’Anjou pears

– 1 batch pâte brisée or sucrée (see below) or prepared pie crust

Preheat. Preheat oven to 400°F

Reduce. Bring wine and cinnamon sticks to a boil, reducing down to about 1/4 C of syrup. This takes about 10 minutes. The kitchen will start to smell like cinnamon.

Caramelize. In the tarte tatin pan, melt butter/margarine with the sugar and stir frequently over low-medium heat (I use #3 – 4 on my induction stove) until it starts to turn a golden brown. Watch carefully. Really carefully. The second it starts to turn brown, take it off the heat. Turn down the heat and return the pan to the burner and let it get a little more golden. Watch it like a hawk. Add the wine syrup and simmer on low.

Cut. While the wine is boiling and then the sugar is caramelizing, peel and core the pears. I used a mini melon baller to help core them. I have made this with halves and quarters and find that while halves may look prettier, quarters are easier to slice and eat.

Cook. Arrange the halves (cut side up) or quarters (on their sides or belly side up if they’ll balance) in a circle around the pan (still on low heat) with thin ends pointed in. Cook for 15 – 20 minutes over low heat. The caramel will bubble up as the pears soften and pear juices seep out.

Roll. Take cold pâte sucrée out of freezer/fridge and roll between two sheets of wax paper into a circle about 1-2 inches larger than your tatin pan. Remove the top sheet, flip the crust over the fruit, and peel away the wax paper, tucking the dough in around the edges. Cut a few slits into the crust so steam can escape.

Bake. Bake 30 minutes until crust turns a nice brown.

Unveil. After cooling the tarte for a few minutes, place a plate (slightly larger than the tatin pan) over the pan, hold your  breath for a second, and carefully flip the tatin on to the plate. Excellent warm or at room temperature. Try it with vanilla ice cream or gelato.

For  pâte sucrée crust:

– 1 1/4 C flour

– 2 T confectioner’s sugar

– 1/4 t salt

– 6 T butter/margarine, partially frozen

– 1 egg yolk

– 3T cold water

Pulse. Add flour, sugar, and salt to food processor and mix. Add frozen butter/margarine and pulse ~ 10 times until the consistency of corn meal.

Pulse again.  Add egg yolk and 1T cold water, and pulse ~ 5 times.

Pulse again. Add 1T cold water, and pulse ~5 times.

Get the picture? Add the last 1T cold water, a little at a time, pulsing in between additions, until the dough starts to come together, but is still a bit crumbly.

Wrap. Gather the dough into a ball, flatten out, and wrap in plastic wrap.

Freeze. Freeze for 20 minutes before using. Or freeze until the next time you want to make a galette or pie or tart or tarte tatin – and then defrost at room temperature for about 15 minutes before using.

Read Full Post »

my fair share

Welcome to 5772. It’s a great year so far and it’s only going to get better. I can feel it. If you didn’t celebrate Rosh Hashanah last week, I still wish you a shana tova u’metuka — a good and sweet new  year.

But, who wants just a sweet new year? As as a slight break with tradition, I also wish you a spicy year with  my favorite butternut squash soup. Sugar and spice and everything nice – that sounds like a great recipe for a new year.

Squash is one of the symbolic foods eaten during Rosh Hashana. So are carrots.

Over the holiday, I cooked and ate my fair share of both.

Squash mash with balsamic onions

I found this recipe in the Williams Sonoma Southwest cookbook when I was planning the menu for a Mexican/Tex-Mex dinner, complete with vegetarian empanadas, guacamole, and salpicon. The original recipe calls for whole squash, but it’s a lot easier with pre-cut and peeled squash chunks. I made enough for 10 as a side dish but this recipe is just a guideline – make as much as you want. If you have an immersion blender, this is the time to take it out. I unfortunately no longer have one: midway through this squash, mine hit its inevitable fate when the motor stripped the internal plastic gear. I had to complete the recipe by hand. And that’s why it’s called a “mash” rather than a purée.

– 3-4 lbs butternut squash chunks or 2 good sized butternut squashes

– 3 heads garlic

– 1 red onion

– 3T + 1T + 3T olive oil

– salt and pepper

– 3 T balsamic vinegar (or to taste)

Prep. Preheat oven to 375ºF. If using whole squashes, cut them in half lengthwise, scoop out the seeds, drizzle with the first 3T olive oil, sprinkle with salt and pepper, and place, cut side up on a parchment-covered cookie sheet . If using pre-cut squash, toss in a big bowl with olive oil, salt, and pepper. Slice the tops off of the garlic, drizzle with 1T olive oil and salt, and wrap in aluminum foil. Also, cut the onion into about 6 chunks and separate the layers. Mix onions with balsamic vinegar and the last 3T olive oil. Set aside.

Roast. Put the squash and garlic in the oven. Roast the squash until soft, about an hour  (sometimes more) for a whole squash and about 45 minutes for squash chunks. The garlic takes about 30-45 minutes. Check both every 15 minutes or so, especially the garlic because it’s pretty easy for it to burn.

Keep roasting. Around the time you take the garlic out of the oven, put the onions on a second parchment-covered cookie sheet and put them in oven. Roast for about 15 minutes until the onions start to brown and crisp up. If you can time it right, they should come out around the same time as the squash. But that’s a big if.

Purée (or mash!). Get your immersion blender ready. If you roasted the squash whole, scoop it out of the skin into a bowl. If you used pre-cut squash, also scoop it into a bowl. Squeeze the roasted garlic from its skin and add it to the squash. Use your immersion blender to purée the squash and garlic. If your immersion blender decides to poop out just before using it, a potato masher works almost as well, but it won’t be as smooth.

Mix it up. Add the onions and any remaining balsamic and stir with the squash.

Eat. Serve warm.

Cumin-roasted carrots

I’m a little embarrassed to call these carrots a recipe,  but they’re just too good to not share. It’s all about the cumin.

Preheat oven to 400°F. Toss baby carrots with olive oil, salt, and cumin. You could also cut regular carrots into diagonal chunks – just be sure to  Be generous with the olive oil. And the cumin. Roast for 30-45 minutes until the carrots turn brown and a little wrinkly. Well, a lot wrinkly.

Read Full Post »